Purple Pleat Magic Redux

Some wisdom pearls need repeating… 🙂


Purple Dress Pleats1 Karin

Behold the power of a pleat! It’s not the fold itself, it’s…the understitching. When a pleated ruche is placed in directions that defy gravity, understitching is required. Invisible handwork like this requires me to use a darning needle for (long and thin) so I can sit on the floor with the hem closer to my eye level. For me, using this technique allows me to tack each pleated corner so it stays in place. Why so particular? These diagonal ones in the front will take the brunt of walking, but the piped longer ones on the skirt back and train will flutter, because their hem is free.  🙂

The 1896 Violet Dress Restoration And Recreation Project, Part 1

Restoring a gown from scratch requires careful planning, knowledge of patterning, and several breathing masks…because those early silk dyes are deadly. I’m looking forward to wearing this soon, and I just restored another velvet chapeau that matches this violet shade! I got this bodice and skirt from an auction with a pinned note of provenance. It belonged to ‘Grace Jennings’ who apparently wore it to a Luisa Downing’s wedding sometime in the late 1890s. This dress is not repairable, so I’m slowly patterning and re-making it. Thank you, Grace! Your dress has a loving home.

Soutache and Chenille Embroidery closeup. The lace false front will be lightened, it’s obvious it was white when it was made.

The hat is pictured backwards just to show how perfectly the flowers harmonize! How sweet to think that two ladies’ Sunday Best will be re-used to make a new ensemble.
Yes, I’m a sentimental sap.

I’m inspired by all this handwork. The borders blend into the garment with a random series of french knots. For some reason, the embroidered part isn’t shattering. Maybe it’s because it’s backed with linen and a cotton batiste. The chenille ‘stamens’ are a mauve silk plush. So 3-D!

I still can’t believe that hat matches so well, I’ve had it for two years and never wear it. It needs a gentle steaming and cleaning.

The label…

This was the note that was pinned to the bodice interior, it’s identified as once being owned by a ‘Grace M. Jennings’ and ‘worn to ‘Luisa Downing’s wedding’. I love this sentimental touch.

I think the belt was an afterthought cut from some scrap fabric. Too much machine topstitching compared to the couture techniques on the garment!

See that pile of violet silk shreds in the box on the right? That’s the skirt. I’l have one chance to pattern it, because it’s disintegrating as I type.


31 bones present in under the bodice and the bodice alone and five in the collar. That’s a lot of stays! And to examine closer…

The first snip is always the hardest. No going back now!

Removing the boning today, thirty seven stays in all. Each one is hand stitched into a silk tube, all seam allowances are finished with bias silk by hand. Saying a little prayer of appreciation to the designer’s details before I remake this bodice!

I always cross my fingers and say a little prayer when I have to take apart an original chapeau to restore it. Going to give that lace a little soak before I sew it back on.

Lace and silk tulle lining removed. There are three different kinds of wire used here and three different threads. I tied a black ribbon to the lace cover so I could easily match it back up.

Sigh. See that tiny understitching? They hold a tiny wire and I get to undo each one individually. Too late to turn back!

Removed all the lace from the front plastron so it can be cleaned. Look at her collar and how it dips in the center front…she had a short neck just like me but was still a slave to fashion!

Lace and silk tulle lining removed. There are three different kinds of wire used here and three different threads. I tied a black ribbon to the lace cover so I could easily match it back up.

Lace is restored to oyster white, the shade it was in 1900. Turns out there were lace appliques that the milliner layered to create “pockets” that perfectly fit over the undulating wire curves. That’s the original label next to it.

Here’s the sad shattered skirt. I get one chance to draft a pattern from this and every time it’s moved, it throws old fabric dust particles in the air. Yes, I’m wearing a mask.

This is an atypical hem for this era, it’s all self-fabric and completely hand-sewn. It’s also the only part of the skirt that has remained intact. In a future post, we’ll have more about the restoration and how we put this design to work for us as recreated fashion. Stay tuned!

It’s All About The Pattern…

One of the questions that we are asked is: “What pattern did you use?” It’s a tricky question from our perspective, because we are designers and not teachers. Our answer is that we pattern them ourselves, I prefer to carefully “lift” them from original garments; Adam loves original pattern sheets and old diagrams with apportioning scales. It’s how we roll, it’s what we also do for fun.


Long story short: Check out the beautiful copper silk gown in the above picture, it’s a beautifully made antique garment that must have been worn only once or twice. I fell in love with the bodice shape and carefully lifted a pattern, then scaled it up to a “modern” 12, then my own size as well. The violet plaid gown is the size 12, and yet it retains the same shape (except I “shallow v’d” the neck and pointed the tails) as the original bodice.

Pattern Work: 1905 Skirt

One of the many projects were working on is is starting work on a new early 1900s day suit design. We’re trying to base this off of original patterns and for skirt, we’ve settled on a pattern that was first published in 1905 by The Ladies Home Journal.

Pattern 1905 Skirt

The original pattern was printed on tissue paper that’s now a hundred years old and needless to say, it’s not suitable for direct use for patterning so the first step is going to be tracing the pattern pieces onto regular pattern paper and then eventually creating more permanent pattern blocks. Fortunately, the pattern pieces had already been cut out (most likely back around 1905) but it took some careful unfolding and smoothing out before the tracing could begin. Also, given the age of the pattern, we dare not iron the pieces in order to flatten them out, which is the usual procedure.

Pattern 1905 Skirt

In working with period patterns, one is struck by just how minimal the instructions and markings on the pattern itself are, especially compared against what’s today’s industry standard. We were able to figure out what the markings on the pattern pieces meant and when checked against the cursory instruction sheet, made complete sense. It’s a ten-gore skirt and it’s a fairly simple pattern, similar to standard skirt pattern blocks that are used today.

Pattern 1905 Skirt

After tracing out the pattern pieces, we lined them up on proper order and made sure that the seams matched up properly and that the waistband and hem line up. We had to do a little truing up on the pattern paper but it was not a real issue. Finally, we noticed that one pattern piece for the belt was missing but this should be easy to remedy.

The next stage will be to cut out a muslin or toile and check it for fit and accuracy and make any necessary corrections to the pattern pieces. One final note, this is pattern that’s definitely designed for a slender person with a waist of 24 inches (corseted, no doubt). What’s also interesting is that the seam allowance is 3/8 inches- we’ll probably add an additional 1/4 inch to bring it to a standard home sewer seam allowance of 5/8 inches (that will give some more leeway for adjustments). Eventually, we’ll probably have to grade this pattern up to several larger sizes. As more progress is made, we’ll be posting updated on the start of what should prove to be an interesting project for 2018.


Design Elements – Color Sets The Mood

One of the key elements in fashion design is color and late 19th Century fashion design is no exception. The design process may vary between individual designers but no matter who they are, they all have to consider what colors they’re going to use in their designs. The selection of colors is dependent on the season (though not always) and as such, tend to follow nature. Today, heavy weight is given to predicting what colors will be popular with fashion consumers because this influences the color and types of fabrics that design houses will order for their new lines; a multi-million dollar industry has been created around predicting what colors will be in for the following year with Pantone being the leading firm because of it setting color standards for a variety of industries.. The following color palettes from Pantone give a good illustration of this:

First we have the palette for Fall 2017:

PANTONE Fashion Color Report Fall 2017, New York

Most of the colors are deep, darker earth tones with a neutral gray mixed in reflecting shorter, darker days, leaves turning and the dying off of plant life in anticipation of winter. Nest, here’s the palette for Spring 2018:

Image result for pantone colors fall 2018

In the above palette for 2018, the colors tend to be lighter, reflecting the increasingly longer days, more sunny weather, and new growth of plants and foliage.

However, before we go on, let me emphasize that color trend predicting is a somewhat subjective and as such, it doesn’t always follow strict rules and as such, it’s more of an approximation today than it was during the 19th Century. Here are two examples from the late 19th Century:

As with other designers, consideration of color makes up a good part of the design process and it’s one of the first steps in the design process. For us, colors fall under three major categories: Fall, Winter, and Spring/Summer. At the same time, we also consider what sort of a garment we’re designing: ball gown, day dress, reception dress, etc. Also, we consider where it’s primarily going to be worn: outside, indoors, indoors at night (e.g., ball room, stage, etc.). Once those questions are answered, we can then proceed with more specific color selections. If the garment is to be worn during the daytime and outside, we tend to first use nature as the first starting point for inspiration.

To illustrate this, let’s consider our Camille picnic dress design. When we originally conceived of it, we were looking for a day dress that could be worn at an outdoor event in the Spring or Summer such as a picnic. The Mid-Bustle Era has always been a favorite with us, so we decided that the style would derive from that period. From there, we determined our color palette, drawing inspiration from the Impressionist painters and Claude Monet in particular. But even more specifically, we wanted to emphasize the Spring with its fresh vegetation and explosion of lighter green colors combined with occasional pops of red or violet and towards that end, Monet’s garden at Giverny was the perfect source of inspiration.

After some online photo research, here’s what we came up with:

Karin Camille Mood Board Spring 2016

Ultimately, the decision was made to go with a bright chartreuse as the primary color based on the greenery found at Giverny that’s portrayed with in Monet’s paintings as well as actual photographs such as this one:

Giverny Monet

Giverny Today

Below are a few more illustrations of the final Camille picnic dress just to give an idea of how the color was ultimately brought to life:

Karin Camille Picnic Dress

Karin Camille Picnic Dress Impressionist

Karin Camille Picnic Dress

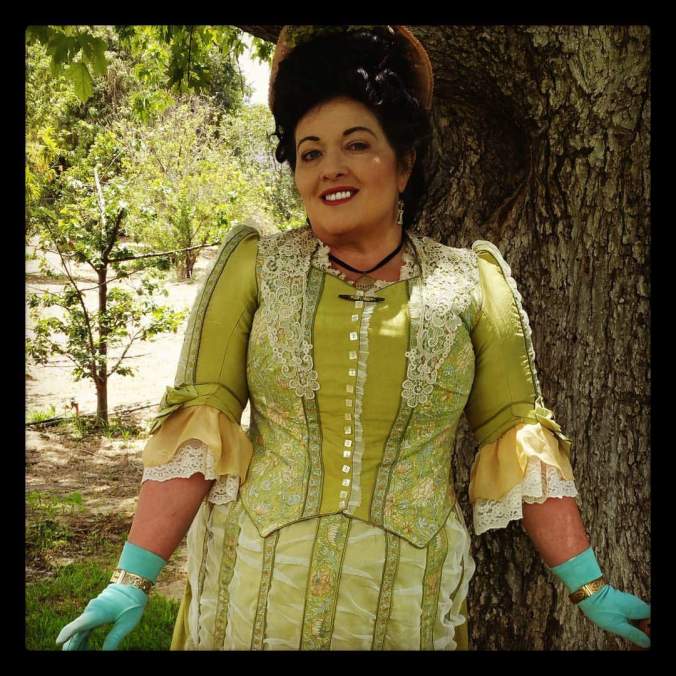
From a color theory standpoint, the colors that we ultimately used for the Camille picnic dress were: chartreuse (both pale and bright), pale champagne gold (on the lower sleeves), and yellow-orange (the fringed trim running on the skirt front):

Image result for bright chartreuse pantone

Image result for old gold pantone

Image result for bright orange pantone

Finally, if viewed on the color wheel, you will notice that they are all analogous colors that are located next to each on the wheel:

color-wheel-300

We hope you’ve enjoyed that this post has helped give you some insight into just one of the many elements that go into making a Lily Absinthe design. Stay tuned for more!